Showing posts with label FVG. Show all posts

Monday, December 1, 2025

Engulfing Bar Strategy | JadeCap

This one pattern helped me make over $4 million in the last three years and even break the world-record payout at Apex. Let me show you exactly how it works:
 
» For a true engulfing pattern, the new candle must break the previous candle’s low and the previous candle’s high. «
 
What Is an Engulfing Bar? We’re simply looking for two candles—along with proper context—to define the pattern: Imagine we have a down candle with its open, high, low, and close. The next candle is what determines whether we have an engulfing bar. For a true engulfing pattern, the new candle must break the previous candle’s low and the previous candle’s high. It completely “engulfs” the previous range (aka Outside Bar/Candle).
 
So picture the first down candle closing. The next candle runs below that low, takes it out, reverses, pushes above the prior high, and closes somewhere near the top half of its range. That two-candle formation gives us a tremendous amount of information about where the next candle—or even the next several candles—may go.
 
Understanding the Context: Inside a higher-timeframe candle (4-Hour or daily), there are dozens of smaller candles—1-minute, 5-minute, 15-minute—that form all the micro-structure. Within that lower-timeframe structure, the engulfing pattern represents:
 
Market Maker Buy Model (for bullish engulfing)

So although it's only two candles on a higher timeframe, those two candles often reflect an entire lower-timeframe reversal model.

The key is the closure. Many beginners think a candle will close as an engulfing bar, only for it to close weakly or back inside the prior range. That invalidates the pattern. A proper engulfing bar should close with a strong, decisive body—typically in the upper 50% for bullish setups, or the lower 50% for bearish setups.

Bullish vs. Bearish ExamplesFor a bullish engulfing bar, the second candle runs below the prior low, reverses, and breaks the prior high (Outside Candle). For a bearish engulfing bar, it runs above the prior high, reverses, and breaks the prior low. Both reflect a higher-timeframe representation of a lower-timeframe Market Maker Model.
 
» Every setup has a failure rate. «
 
What Most Traders Don’t RealizeEvery setup—Engulfing Bars, Fair Value Gaps (FVGs), Market Maker Models—has a failure rate. I learned this the hard way after blowing dozens of accounts trying to trade every engulfing bar I saw. Two things matter:
  1. Every setup fails sometimes. If you backtest these candles, you'll see some of them lose. Your job is not to find the magical 100%-win-rate setup. It doesn’t exist. You may find these patterns work 60% of the time. Your winners must be managed well enough to pay for the losers.
  2. Location matters. A lot. When I was new, I took every engulfing bar. That was a huge mistake.
    If you're bullish, you want the engulfing bar to form at a swing low, ideally after taking out sell-side liquidity.
    If it forms after taking out buy-side liquidity—at a high—it's often a sign of exhaustion and more likely to fail.
    The reverse is true for bearish setups.
Avoid:
Bullish engulfing bars printed at or after taking out buy-side liquidity.
Bearish engulfing bars printed at or after taking out sell-side liquidity.
 
These filters alone drastically improve your win rate.
 
The $98,000 ExampleLet’s walk through the trade from last week. We printed a large bullish engulfing candle immediately after FOMC. The candle swept sell-side liquidity, reversed, broke the prior high, and closed strongly—exactly what we want at a swing low. We were also inside a daily Fair Value Gap (FVG), adding even more confluence.
 
Bullish Engulfing Bar Setup in the NZDUSD (4-Hour candles). 

My first target was buy-side liquidity above the highs. Since the market was near all-time highs, I was also looking for a move toward the psychological 25,000 level. As soon as the futures market reopened at 6 p.m., I entered with a 20-lot position. My stop was below the weekly open. I was looking for roughly a 1:3 risk-to-reward.
 
On the lower timeframes, the price action continued to confirm the model—bullish FVGs forming on the way up, continuation structure holding. Meanwhile, bearish engulfing candles printed at swing lows failed, exactly like we want to see.
 
I showed the live account login on the video: real balance, real fills, floating around $93,000 at one point. But the dollar amount doesn’t matter. If your account is small, making $200 or $400 using the same rules is identical—it’s just a matter of position size. Years ago, I was risking $500–$1,000. As my net worth grew, I increased my risk proportionally. Eventually, price hit my target and I closed the trade for roughly $98,000.
 
Final ThoughtsEngulfing bars are easy to spot—but only powerful when combined with
 
    Proper context
    Liquidity understanding
    Market structure
    Higher-timeframe narrative
    Disciplined trade management
 
Your homework is to backtest and forward-test these exact setups: where the engulfing bar forms, where the liquidity sits, where your stop should go, and how to trail it as price moves in your favor. Scaling in, adjusting stops, and managing the trade all revolve around that one pattern.

With this engulfing bar strategy and the rules I just shared, you now have everything you need to start identifying high-probability opportunities. Remember: profitable trading isn’t about talent or luck—it’s about discipline, patience, and following your rules every single time.

Reference:
 
 
See also:

Friday, July 18, 2025

Simple ICT Day Trading Strategy That Works Every Day │ JadeCap

This trading strategy focuses on entering positions based on significant daily highs and lows, utilizing ICT's "Power of Three" framework—accumulation, manipulation, and distribution. With this approach, I earned $4.5 million and I’m here to show you how simple it can be: 
 
» Do not trade if the market has already hit the target high/low. «
 
The Key is to target historical levels beyond just the last 24 hours and to use the New York midnight open for optimal entry points. By staying committed to the market direction from the previous day and timing your trades around key sessions like New York or London (ICT Kill Zones), you can capture manipulation moves for more favorable risk-to-reward ratios. 
 
» I’m here to show you how simple it can be. « 
 
Now, I'll walk you through the three-step process I use to achieve results every day:

1.) Identify Key LevelsDetermine the previous daily high or low as the target based on bullish or bearish conviction from prior day’s close.
2.) Assess Market Context: Confirm the market is trading below the previous daily high (for bullish trades) or above the previous daily low (for bearish trades) to avoid chasing price.
3.) Apply Power of Three:
Accumulation: Identify a range (e.g., Asian or London session) where orders build up.
Manipulation: Look for a temporary move against the expected direction (e.g., bearish move in a bullish setup) to trap traders.
Distribution: Enter trades as the market moves toward the target high/low, ideally near the midnight open for better risk-to-reward.


Entry and Risk Management
:
  • Enter trades on lower time frames (e.g., hourly) using setups like fair value gaps, order blocks, or liquidity raids that align with the high time frame direction.
  • Place stop losses logically (e.g., at 50% of a Fair Value Gap or below a key level).
  • Exit trades based on time (e.g., end of a 4-hour candle) or when the target is reached, avoiding overnight holds for futures.
Avoid Common Pitfalls:
  • Do not trade if the market has already hit the target high/low.
  • Avoid setups misaligned with the high time frame direction.
  • Trade smaller or not at all if the market has expanded in your direction before entry.
Reference:


See
 also:

Thursday, July 17, 2025

ICT Intraday Liquidity & Volatility Trading Playbook │ JadeCap

This strategy focuses on how price reacts to liquidity and volatility during the trading day. Liquidity refers to the areas on a chart where other traders have placed stop-loss orders, usually just above recent highs or just below recent lows. The market often moves into these areas to trigger those stops, and then either reverses sharply or continues strongly in the same direction.

Trade Example - NQ Short (1-H Chart)
 
The goal of this strategy is to spot those liquidity grabs, wait for a clear reaction, and then enter with confidence—either to trade the reversal or the continuation. The method is built for traders who prefer to focus on one trading day at a time, using clear logic, session structure, and precise timing.
 
On this episode of Chart Fanatics we are joined by Kyle Ng (AKA Jadecap). Regarded as ICT's best student and recently achieved a world record payout with Apex. Kyle reveals his complete ICT playbook that allowed him to generate millions from the markets. In this episode you'll learn how to manage open exposure and lock in profits, how to predict the next daily candle and the psychology behind avoiding greed in a trade. Riz Iqbal, May 15, 2025.

Each trade begins with a daily bias: a simple outlook on whether price is likely to move up or down today. Then the trader watches for session liquidity raids (like the Asian or London session highs/lows being taken out), and enters only after confirmation appears through a fair value gap, market structure shift, or divergence between markets. This model works well for intraday trades but can also be used for swing trades when the higher time frame aligns with the setup.

To take a trade using this model, the following must be true:

Clear Daily Bias: Decide if you’re bullish or bearish for the day using the daily chart.
Consider recent highs, lows, inefficiencies, and where the price is likely to go next.
Session Liquidity Zones Marked: These are common stop zones and entry traps:
Previous Day’s High and Low
Asian Session High/Low
London Session High/Low
Wait for a Liquidity Raid: A key session level must be taken out during the New York session — this is your signal
that stop orders have been hit and a potential move is beginning.
Confirmation on Lower Time Frame (15m / 5m). After the liquidity raid, wait for one of these confirmations:
Fair Value Gap (FVG)
Market Structure Shift (MSS)
Turtle Soup (false breakout and reversal)
Breaker Block
Ideal Time Window
Trade setups should form between 9:30 and 11:30 AM EST/EDT.
 
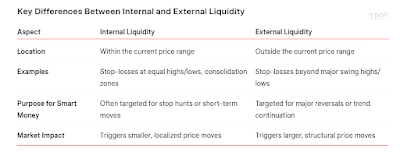
Key Differences Between Internal and External Liquidity.

Target & ExitYour target depends on the setup type. Intraday Targets: Opposite session liquidity, fair value gaps, or  equal highs/
lows. If the trade slows near midday, consider exiting  even before the full target is reached.
Swing Targets: Use higher time frame liquidity zones (daily/weekly highs or lows), imbalances, or major structure. 
Swing trades can be held for multiple days as long as the bias and structure support it. Use time-of-day awareness, price behavior, and your risk profile to decide whether to hold or exit early.

Pros & Cons of the Strategy
This model is designed to deliver high quality, repeatable setups — but like any trading method, there are key things to understand before using it. Note: The cons listed here aren’t disadvantages. They are things to be aware of — important characteristics that require patience, discipline, and proper management to make the model work effectively.
 

Trade Example - NQ Short (15-Min Chart)

Reference:
ooooOoooo
 
If markets continually trend higher, any run on short-term highs should only be seen as short term liquidity being taken. Any retracement lower should be framed as a return to internal range liquidity prior to continuation.This keeps you on the RIGHT side of the market and you stop anticipating major reversals. Never try to pick tops and bottoms. Leave that to the big boys. We only want to ride their coattails. JadeCap's Trading Room, July 16, 2025.
 
Looking for Tuesdays highs on ES. JadeCap's Trading Room, July 17, 2025, 9:03.
 
I stopped adding new concepts and tools and just focused on properly executing what I've already learned. A few lines, context, and ironclad risk management. Stop focusing on the P&L and the size of your trades. If you can trade 1 micro you can trade 10 minis. But you can't do that at scale without a solid PROCESS. JadeCap's Trading Room, July 17, 2025, 14:47

Sunday, July 14, 2024

Trading Major News Events | D'onte Goodridge

News events typically inject momentum into the market, often prompting traders to anticipate where price might trend in response to the news. Making educated predictions about these movements is a common strategy rooted in technical analysis. Position yourself AFTER major news releases (NFP, CPI, PPI, PMI, FOMC etc.) with either a Pump & Dump or a Dump & Pump trading setup.


Sell Scenario/Setup: Wait for the buy side liquidity pool on the 15 minute timeframe to be raided first. After that, go to the 1 minute timeframe entry above the killzone's opening price. Then, anticipate that price will revert back down to a sell side liquidity level.
 
 
Buy Scenario/Setup: Wait for the sell side liquidity pool on the 15 minute timeframe to be raided first. After that, go to the 1 minute timeframe entry below the killzone's opening price. Then, anticipate that price will revert back up to a buy side liquidity level.
 
When price moves above the opening price of a killzone, it's in a premium. This is where to find ideal sell entries. 


When price moves below the opening price of a killzone, it's in a
discount. This is where to find ideal buy entries.

Thursday, July 4, 2024

Structural Characteristics of Bullish and Bearish Months | D'onte Goodridge

Traders want to find trending markets but often fail to see and understand the structural characteristics of bullish and bearish months. Both move in a similar fashion but inverse to one another. Here are the characteristics for the formation of a bullish month:
 
 
The first example is a daily chart of US Dollar versus Japanese Yen (USDJPY) during February 2023. The market was trending up. It was a bullish month. Let's identify the five key factors to a bullish month:

1. Price moves below the monthly opening price.
2. A swing low forms below the month's open.
3. Price purges a previous daily low (PDL) and reverses back to a previous daily high (PDH).
4. The market creates a market structure shift (MSS) to the upside and an Imbalance or Fair Value Gap (FVG).
5. Higher swing highs and higher swing lows form.
 

Looking at the daily candles in the USDJPY chart, we see the methodical sequence of a Bullish Month developing:
 
1. Price was movesg below the monthly opening price. Price stops below it, runs up, drops below it, runs up and continues the bullish trend.
2. A swing low below the month's open forms. This is a swing low because the candle on the left has a higher low and the candle on the right has a higher low, hence the low in the middle is the lowest point. To form a swing low  only takes three bars.
3. Price purges a previous low and works back to a previous high. The following day price reverses back to the previous daily high, all happening within a three bar setup, creating a swing low, which is a purge on the previous daily low and a reversal back to a previous daily high.
4. Next the market creates a shift to the upside with speed through a previous swing high and a FVG.
5. And price created a new swing high and a higher swing low.

The next example is a daily chart of Apple during January 2023. The same five criteria for a Bullish Month were met:
 

Now let's look at the five key factors to a Bearish Month:

1. Price moves above the monthly opening price.
2. A swing high forms above the month's open.
3. Price purges a previous daily high and reverses back to a previous daily low.
4. The market creates a shift to the downside and a FVG.
5. Lower swing highs and lower swing lows form.
 

The first example is a daily chart of British Pound versus US Dollar during August 2022. The market was trending down. Identify the above listed five criteria for the formation of a Bearish Month:
 
 
The last example is a daily chart of Gold during February 2023. Gold was in a down trend. Identify the structural criteria for the formation of a Bearish Month:


Wednesday, May 29, 2024

ICT Optimal Trade Entry (OTE) | Darya Filipenka

Timing is an important factor in trading, and a well-defined strategy can significantly increase your chances of success. The ICT Optimal Trade Entry (OTE) strategy is one approach that traders can utilize to identify high-probability trade setups. It’s important to pinpoint the specific time and day when the OTE is most likely to occur. Typically, this happens between 8:30 AM and 11:00 AM, New York local time.
 

Market Structure - As the market rises and declines and makes
higher highs/lower lows, each new swing higher/lower in price is anchored or directly reacting to another swing higher or lower. Every swing in price has an equal counter swing it is unfolding from and attempting to fulfill. 
 
Market Structure Shift (MSS) - comes from the HL or LH levels, it will serve as one of the reasons for us to enter the trade. A market structure shift is depicted as a significant level on the chart where the prior trend Is invalidated. When the market is in an uptrend, the market structure shift level is typically identified as a point where a lower low is formed. Conversely, in a downtrend, the market structure shift level Is often observed at a juncture where a higher high emerges. Notably, these market structure shifts tend to arise following a displacement, signaling a potential shift in the overall trend direction.

1. The Premium Zone represents the price correction range situated above the 0.5 (50%) level in the context of a downward momentum. Traders pay attention to this zone when considering selling opportunities.
2. The Discount Zone refers to the price correction range located below the 0.5 (50%) level in the case of an upward impulse. Traders observe this zone for potential buying opportunities.
3. The Equilibrium Zone denotes the price range where the asset's average price is located. In other words, it represents the fair price zone or the level of balance between buyers and sellers.
 

Traders and market makers seek opportunities to buy at a Discount and sell at the Premium zone. As a result, traders often disregard the 0.236 and 0.382 Fibonacci levels in their analysis and instead wait for the price to move above or below the equilibrium level. We focus on the Premium / Discount Zones, since the price does not always enter the OTE zone. Sometimes it is enough for price to adjust by 0.5 (50%) in order for the big man to gain or lose a position.
 

To select the high and low points of a dealing range, follow these steps:

1. Run a Fibonacci retracement tool from the highest high to the lowest low within the dealing range. This will help establish the overall range of price action.
2. Pay attention to areas where the algorithms consolidate. These consolidation areas indicate fair value and are important in determining the proper dealing range.
3. Consider the nearest high when the 50% Fibonacci level aligns with the common consolidation area. This will help identify the appropriate high point of the dealing range.
4. Select the lowest low as the low point of the dealing range. This ensures that the range encompasses the relevant price action and aligns with the areas where algorithms are active.

To implement the OTE strategy, follow these steps:

1. Determine the current market structure, whether it has a bullish or bearish bias. This ia crucial as Fibonacci levels work best within a trending market.
2. Identify significant swing highs and lows to draw the Fibonacci grid. These highs and lows are often visually prominent and easy to label.
3. Use the Fibonacci retracement tool to assess the correction potential in an uptrend (from bottom to top) or downtrend (from top to bottom).

Using OTE during Silver Bullet: After identifying the MSS, I recommend drawing an OTE retracement from the Swing Low (High) to the Swing High (Low). The optimal entry point for trades is typically at the 62% retracement level of that range. Once the trade is entered, the first target is typically set at the -27% extension level, and the second target is set at the -62% extension level. Wait for price to trade back into the FVG (Fair Value Gap) and then reprice out of the FVG towards the targeted pool of liquidity. Usually a FVG lines up with the 62% retracement level.  
 
Reference: